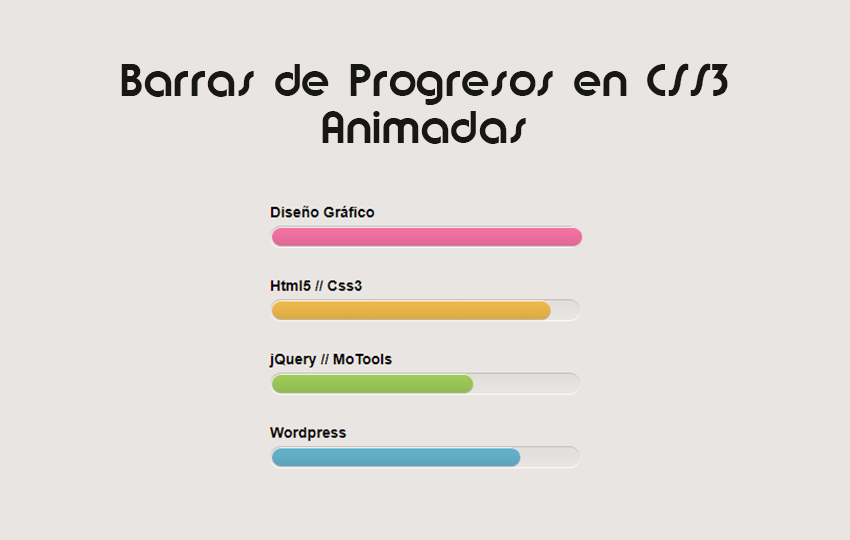
A continuación vamos a aprender a crear unas barras de progreso en Css3 animadas. En el ejemplo las usaremos para las habilidades en diferentes campos del desarrollo web y gráfico.
Barras de progreso en CSS3
Para realizar este tutorial es necesario que repases el tema de las animaciones en Css3, sobre todo el uso de los @keyframes.
El html
Para crear una barra de progreso no necesitamos mucho, así que nuestra estructura en HTML va a ser muy sencilla. Tan sólo vamos a usar una lista de elementos con nuestras habilidades.
A cada elemento de la lista le asignaremos las clases que se encargarán en CSS3 de realizar la animación, color y demás estilos que sean necesarios.
<ul id="skill">
<li><span class="bar graphic-design"></span><h3>Diseño Gráfico</h3></li>
<li><span class="bar html-css"></span><h3>Html5 // Css3</h3></li>
<li><span class="bar jquery"></span><h3>jQuery // MoTools</h3></li>
<li><span class="bar wordpress"></span><h3>Wordpress</h3></li>
</ul>
El Css3
Ahora que ya tenemos nuestra estructura HTML es momento de ponernos a dibujar nuestra barra de progreso en Css3.
5 Scripts de comparación de imágenes gratis
Tendremos que trabajar los colores, fuentes, listas y como no las diferentes animaciones.
body { background: #E9E5E2 ; }
#skill {
list-style: none;
font: 12px "Helvetica Neue", Arial, Helvetica, Geneva, sans-serif;
width: 296px;
margin: 50px auto 0;
position: relative;
line-height: 2em;
padding: 30px 0;
}
#skill li {
margin-bottom:50px;
background:#e9e5e2;
background-image: -webkit-gradient(linear, left top, left bottom, from(#e1ddd9), to(#e9e5e2));
background-image: -webkit-linear-gradient(top, #e1ddd9, #e9e5e2);
background-image: -moz-linear-gradient(top, #e1ddd9, #e9e5e2);
background-image: -ms-linear-gradient(top, #e1ddd9, #e9e5e2);
background-image: -o-linear-gradient(top, #e1ddd9, #e9e5e2);
background-image: linear-gradient(top, #e1ddd9, #e9e5e2);
height:20px;
border-radius:10px;
-moz-box-shadow: 0 1px 0px #bebbb9 inset, 0 1px 0 #fcfcfc;
-webkit-box-shadow: 0 1px 0px #bebbb9 inset, 0 1px 0 #fcfcfc;
box-shadow: 0 1px 0px #bebbb9 inset, 0 1px 0 #fcfcfc;
}
#skill li h3 {
position:relative;
top:-25px;
}
.bar {
height:18px;
margin:1px 2px;
position:absolute;
border-radius:10px;
-moz-box-shadow: 0 1px 0px #fcfcfc inset, 0 1px 0 #bebbb9;
-webkit-box-shadow: 0 1px 0px #fcfcfc inset, 0 1px 0 #bebbb9;
box-shadow: 0 1px 0px #fcfcfc inset, 0 1px 0 #bebbb9;
}
.graphic-design {
width:100%;
-moz-animation:graphic-design 2s ease-out;
-webkit-animation:graphic-design 2s ease-out;
background-color: #f674a4;
background-image: -webkit-gradient(linear, left top, left bottom, from(#f674a4), to(#e06995));
background-image: -webkit-linear-gradient(top, #f674a4, #e06995);
background-image: -moz-linear-gradient(top, #f674a4, #e06995);
background-image: -ms-linear-gradient(top, #f674a4, #e06995);
background-image: -o-linear-gradient(top, #f674a4, #e06995);
background-image: linear-gradient(top, #f674a4, #e06995);
}
.html-css {
width:90%;
-moz-animation:html-css 2s ease-out;
-webkit-animation:html-css 2s ease-out;
background-color: #f0bb4b;
background-image: -webkit-gradient(linear, left top, left bottom, from(#f0bb4b), to(#d9aa44));
background-image: -webkit-linear-gradient(top, #f0bb4b, #d9aa44);
background-image: -moz-linear-gradient(top, #f0bb4b, #d9aa44);
background-image: -ms-linear-gradient(top, #f0bb4b, #d9aa44);
background-image: -o-linear-gradient(top, #f0bb4b, #d9aa44);
background-image: linear-gradient(top, #f0bb4b, #d9aa44);
}
.jquery {
width:65%;
-moz-animation:jquery 2s ease-out;
-webkit-animation:jquery 2s ease-out;
background-color: #a1ce5b;
background-image: -webkit-gradient(linear, left top, left bottom, from(#a1ce5b), to(#91ba52));
background-image: -webkit-linear-gradient(top, #a1ce5b, #91ba52);
background-image: -moz-linear-gradient(top, #a1ce5b, #91ba52);
background-image: -ms-linear-gradient(top, #a1ce5b, #91ba52);
background-image: -o-linear-gradient(top, #a1ce5b, #91ba52);
background-image: linear-gradient(top, #a1ce5b, #91ba52);
}
.wordpress {
width:80%;
-moz-animation:wordpress 2s ease-out;
-webkit-animation:wordpress 2s ease-out;
background-color: #66b3cc;
background-image: -webkit-gradient(linear, left top, left bottom, from(#66b3cc), to(#5da3ba));
background-image: -webkit-linear-gradient(top, #66b3cc, #5da3ba);
background-image: -moz-linear-gradient(top, #66b3cc, #5da3ba);
background-image: -ms-linear-gradient(top, #66b3cc, #5da3ba);
background-image: -o-linear-gradient(top, #66b3cc, #5da3ba);
background-image: linear-gradient(top, #66b3cc, #5da3ba)
}
@-moz-keyframes graphic-design {0% { width:0px;} 100%{ width:100%;} }
@-moz-keyframes html-css { 0% { width:0px;} 100%{ width:90%;} }
@-moz-keyframes jquery { 0% { width:0px;} 100%{ width:65%;} }
@-moz-keyframes wordpress { 0% { width:0px;} 100%{ width:80%;} }
@-webkit-keyframes graphic-design { 0% { width:0px;} 100%{ width:100%;} }
@-webkit-keyframes html-css { 0% { width:0px;} 100%{ width:90%;} }
@-webkit-keyframes jquery { 0% { width:0px;} 100%{ width:65%;} }
@-webkit-keyframes wordpress { 0% { width:0px;} 100%{ width:80%;} }
Conclusión
Para aprender a realizar vuestras propias barras de progreso os recomiendo que escribáis todo el código, y no copiar y pegar, ya que así podréis ver paso a paso los diferentes cambios que se producen en la página.
Gracias por vuestra visita, y como siempre déjanos tus sugerencias, dudas y likes en nuestras redes sociales. ¡Gracias!